Tuesday, April 26, 2011

Unstuffed Pepper Bake

It's 70 degrees here and it just happens to be a Tuesday. You know what that means, more blog goodness from your fave food diva's!
So this week one of your blog chicka's (me) has been injured on the cooking sidelines. Because of a window and my foot/ankle I have a fracture that has had me laying on the couch for 6 days already. I swear that window came out and slapped my foot/ankle. That's my story and I'm sticking to it.
When we last left you we had much enjoyed my pick which was Caesar Burgers and in this week's recipe we go the opposite route and focus on the always family friendly casserole dish. It's Ma's pick and this recipe she found comes to us from the good peeps at Krogers. Let's take a look:

Unstuffed Pepper Bake

Prep Time: 15 minutes
Total Time: 35 minutes
Serves: 4-6

Ingredients:
- 1 lb Kroger® Ground Beef
- 1/3 c Kroger® Frozen Diced Onion
- 10 oz pkg Kroger® Recipe Beginnings Chopped Green Peppers
- 2 Garlic Cloves, minced or ½ tsp Garlic Powder
- ½ tsp Kroger® salt
- ¼ tsp Kroger® Ground Black Pepper
- 14.5 oz can Kroger® Petite Diced Tomatoes, drained
- 1 cup Kroger® Instant White or Brown Rice
- 1 tsp Kroger® Worcestershire Sauce
- 1 tsp Kroger® Italian Seasoning
- 8 oz pkg Kroger® Finely Shredded Sharp Cheddar Cheese, divided
- 15 oz can Kroger® Tomato Sauce


Directions:
1) Preheat oven to 375°F.
2) In a large sauce pan, sauté ground beef and onions, green peppers and garlic for 5 minutes, or until beef is browned. Drain off excess fat, and season with salt and pepper.
3) Stir in the tomatoes, rice, Worcestershire sauce and Italian seasoning. Remove from heat, and stir in 1 cup cheese.
4) Spread mixture evenly into a 13x9 baking dish and top with tomato sauce and remaining cheese.
5) Bake for 20 minutes, until heated through and cheese is melted and bubbly.

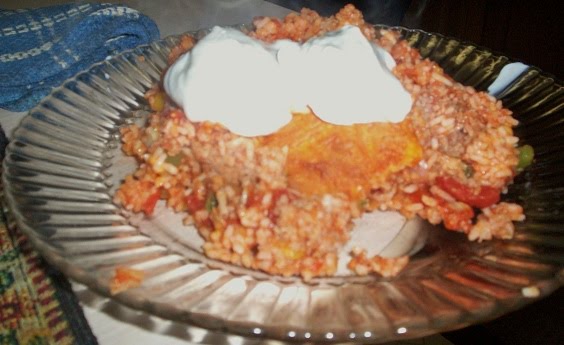


Ladies and Gents this one was a homerun! It reminded me of my filling for enchilada's (that's another recipe saved for another Tuesday)
and it had this Spanish rice feel to it. Filling, yummy, and the fam's tummy's are happy. What else could you ask for??

Tid Bits:

*We used ground turkey instead of beef so feel free to do the same

*We put our bag of peppers into the microwave for 2 minutes then took kitchen scissors and chopped the peppers.

*The recipe calls for to put the tomato sauce on top of everything but we mixed it all into a bowl instead. We put half the mixture into the pan. topped it with some of the cheese, then placed the remaining mixture on top followed by the rest of the cheese.


Ma's Spot: This was another winning recipe for me. It was quick and simple to make and lets face it the best part of stuffed peppers is the inside and this is like having a big stuffed pepper without having to scoop it out. So I will definitely be making this one again. I encourage you to make it on one of the nights that you don't have alot of time but you really want something good to eat.


Time for some Glee, and some pain meds for this fracture. So adios for now blog readers. Don't be sad, we'll be back to give you more food ideas, tip, tricks, and entertainment next week. What's in store? My pic...hmmm...I have no clue but as always come back. It'll be good! Have a great week guys! :D.


Spoons & Spatula's
~Dinah & Ma

Tuesday, April 19, 2011

Caesar Burger & Home Fries

Hiya blog readers!

Another Tuesday is here and you know what that means more good food is coming your way courtesy of your blog diva extraordinaire (me) and Ma. On this kinda dreary Tuesday I was hoping for good weather since when I wrote last week's entry it was amazing outside. Foolish me I thought it would stay that way but this is Michigan weather we're talking about and yesterday we even had snow show up and ruin the springtime party. Ridiculous. *shakes head* I digress, I refuse to have that annoying white dusting mess up our plans for a good burger! Now if you're like me you do like a good juicy burger every once in a while and that's what we have on the menu for today. This recipe comes to us from Kitchen Daily website and I found it by going to the handy google.com and typing in Caesar Burger, haha. Plain and simple and lookie what popped up:


Caesar Burger

2 pounds all natural ground chuck (80/20blend) shaped into 6 burgers
1 1/2 cups roasted red peppers thinly sliced
1 1/2 cups Parmesan shavings loosely packed (can also shredded Parmesan)
3 ripe Roma tomatoes sliced
Romaine thinly sliced
Roasted Garlic & Basil Aioli (recipe follows)
6 Brioche or good quality hamburger buns
Kosher or Sea salt
Freshly ground pepper
6 medium garlic cloves
3 Tbs olive oil
2 Tbs fresh basil finely sliced
1 tsp. Dijon mustard
1 Tbs. fresh lemon juice
1 cup mayonnaise


Directions

To prepare aioli sauce: Heat olive oil in small sauté pan over medium-low heat. Add garlic & sauté until soft & brown. Remove garlic & reserve oil for brushing inside of burger buns. Roughly chop garlic & puree with flat side of knife. Put in mixing bowl with basil, Dijon, lemon juice, mayonnaise and season with salt & pepper. Refrigerate.

To prepare burgers: Heat the grill to medium-hot heat & lightly oil grill.

Place burgers on grill season with salt & pepper. Grill burgers to medium doneness (about 4 minutes per side for medium 3 minutes for medium rare).

Brush inside of buns with reserved garlic oil & grill cut side down on cooler side of grill until golden brown. Put romaine on bottom of bun top with burger Parmesan shavings tomatoes roasted red peppers & Roasted Garlic & Basil Aioli Sauce.


O.M.G. this recipe is a-mazing! Hey, that rhymed, haha. Soooooooooo good! The sauce makes this dish. The flavors blend well together and it just makes one awesomesauce burger. :D.


Tid Bits:

*Not a fan of red meat? Try ground turkey or any other type of veggie pattie. Those would be some yummy substitutes.

*We made home fries so you can add whatever you like with the burgers.

*Instead of spending a loot for roasted red pepper in the jar with all that oil we suggest buying a red pepper and roasting it on an open flame. Keep turning it until it's soft but still a tad firm. Peel the skin off and cut into thin strips.


Ma's Spot: I really really enjoyed this meal. I liked the taste of the turkey burger with the sauce compared to the hamburger itself. With the sauce, cheese, and romaine it tasted like a Caesar salad. As for my home fries (shown in the picture) my family really enjoys this version instead of the frozen kind in the bag. How to make those are: You cut and peel your potato's (try and make them all around the same size for better cooking results) then place them on a non greased cookie sheet. Sprinkle olive oil on top of the potato's followed by seasoning (I used Mrs. Dash, pepper, and oregano) of your choice. Hand toss to coat your fries. That way you don't have to pre-grease your pan. Place fries in a 400 degree oven for 20 to 25 minutes but it depends on how you like your fries. Enjoy!


Alrighty guys and dolls that's it for this week's entry. We'll see you next Tuesday for another round. What's in store for next week? Good question lol. It's Ma's pick and she hasn't told me anything yet so I guess we'll find out together, ha! Have a great week guys!


Spoons & Spatula's
~Dinah & Ma

Tuesday, April 12, 2011

Crispy Orange Chicken Bowl

Evening Dolls!

First and foremost, Spring is apon us! Those kind of days you live for when it's got just the right chill in the air to have a small blanket around you and during the day you can open your windows and wear some cute shorts. Oh! and it's time to spruce up those iPods and place some good summer jams on there. May I suggest "Morning Sun"-Sugar Ray (yes, Sugar Ray lol) "I Was Made For Sunny Day"-The Weepies & "Toes"-Zac Brown Band. Now you must be wondering what in the good golly hell does this have to do with our food blog? Well, lots actually. Means we can start grilling and making interesting salads and cold pasta's. It's gonna get good over this warm season so definitely stay tuned. It won't be anything to miss!

Anywho, it is only the beginning of this beautiful weather and we're back to reality lol. This week's recipe is Ma's pick and to tell you the truth I'm pretty jazzed about it. We're going down the path of teriyaki noodles and soy sauce. Ah, yes! I love any excuse to eat some noodles. Hey, I'm Italian I can't help it. Oh, and I know alllllll those eyes who read this in some form like the stringing yummy material called pasta.

So, follows me to what makes this week's yummy concoction:


Crispy Orange Chicken Bowl
Prep time: 20 Minutes
Cook time: 10 minutes

1 pkg. Knorr Asian Sides teriyaki Noodles
1 bag (16 ounces) frozen stir-fry veggies, thawed
1/4 cup toasted sliced almonds
1 box (12 ounces) chicken nuggets, prepared according to package directions
1/4 cup orange marmalade or apricot preserves
2 tsp. reduced sodium soy sauce
1 tsp. white vinegar

*Prepare Knorr Asian sides teriyaki noodles according to package directions. adding veggies during the last 2 minutes of cook time. Stir in almonds. Evenly divide into 4 bowls.

*Toss chicken with marmalade, soy sauce, and vinegar in medium bowl. Serve over hot noodles.

*Garnish, if desired with additional almonds and chow mein noodles. Refrigerate any leftovers. Serves 4.


So how good was it? This dish was winning like Charlie Sheen! Total yum fest. Quick, cheap, and yummy meal. Loved by all around here so I encourage very much so to go forth and whip this up. It's one for the books.


Tid Bits:

*If you're not into the chicken nuggets in the frozen food isle then we suggest trying some boneless skinless chicken breast cut into strips or however you fancy them.

*We used Italian style veggies but feel free to use any kind you like.

*Because we're all piggy's around here haha we doubled this recipe but when you do so eye ball the veggies because honestly 2 bags over powers the noodles.


Ma's Spot: Love love this recipe! I really enjoyed it. If you like Chinese food and find your pockets empty this is a great dish to satisfy your Chinese taste. I will definitely be making this again and I'll take note from our tid bits and use the boneless skinless chicken breast. I think the next time instead of using Italian style veggies I'm going to go with the frozen 3 pepper blend.


Aw, another week over. I swear these Tuesdays go by so damn fast I can't keep up. I always wanna stay and chat with you guys lol. Hmm, well Okie guys as always we'll be back. Same time, same station, same yummy food waiting to be made. What's in store for next week? Well...no clue yet. It's my turn to choose and with this fabulous weather I may pick something....outdoorsy? Hmm, sounds good to me! Have a great week guys! :D.


Spoons & Spatula's
~Dinah & Ma

Tuesday, April 5, 2011

Deep-Dish Sausage Patty Pizza

Evening Dolls!

You read right, we're going deep dish tonight!

Toss out those Jets and Pizza Hut menu's cause we're staying in tonight. This week was my pick and while digging around some on the Pillsbury website I came across this recipe for a deep dish pizza. It occurred to me I have never in my life made a deep dish pizza. Before your jaws drop may I remind you guys that I Dinah have burned boiling water. Yeah, just file me under the Jessica Simpson folder with the tab stated "Blonde burns boiling water" next to the "Chicken/Tuna" comment. I digress though this recipe seems simple enough when I found it and why not go with a pie tonight?

So what's in this? Follows me peeps!

Deep-Dish Sausage Patty Pizza

Prep Time: 35 Min
Total Time: 1 Hr 15 Min
Makes: 8 servings

INGREDIENTS

Sauce
2 tablespoons Crisco® 100% Extra Virgin Olive Oil or Pure Olive Oil
1/4 cup chopped onion
2 teaspoons finely chopped garlic
1 can (28 oz) Muir Glen® whole peeled tomatoes, drained, 1/2 cup juice reserved and tomatoes coarsely chopped
1 teaspoon McCormick® Basil Leaves
1 McCormick® Bay Leaf
1/4 teaspoon salt
2 or 3 dashes McCormick® Black Pepper

Pizza
1 lb bulk sweet Italian pork sausage
2 tablespoons Crisco® 100% Extra Virgin Olive Oil or Pure Olive Oil
1 tablespoon cornmeal
1 can (13.8 oz) Pillsbury® refrigerated classic pizza crust
4 cups shredded mozzarella cheese (1 lb)
2 teaspoons grated Parmesan cheese

DIRECTIONS

1) Heat oven to 400°F. In 2-quart saucepan, heat 2 tablespoons oil over medium-high heat. Add onion and garlic; cook about 4 minutes, stirring constantly, until onion is tender. Stir in tomatoes, basil, bay leaf, salt and pepper. Reduce heat to medium-low. Simmer uncovered 20 minutes, stirring occasionally. Stir in reserved tomato juice. (Sauce should be thick.) Remove and discard bay leaf.

2) Meanwhile, spray 12-inch skillet with Crisco® Original No-Stick Cooking Spray. Spread sausage over bottom of skillet into large patty. Cook over medium-high heat 5 to 8 minutes on each side, turning once, until no longer pink in center. (If necessary, cut patty in half or into quarters to turn.)

3) Coat bottom and side of 12-inch cast-iron skillet or other ovenproof skillet with 1 tablespoon oil; sprinkle with cornmeal. Unroll pizza crust dough in skillet; press on bottom and at least halfway up side. Brush dough with remaining 1 tablespoon oil; prick bottom and sides of dough with fork. Sprinkle mozzarella cheese over dough. Top with sausage patty, keeping patty in one piece.


4) Bake 15 to 18 minutes or until crust is light golden brown. Spread sauce over sausage. Bake 5 to 10 minutes longer or until crust is golden brown. Sprinkle with Parmesan cheese. Let stand 10 minutes before cutting.


So how did this one pan out? It was a miss for me and a hit for everyone else. I simply didn't like it. Aw, come on guys this is what this blog is all about. Trying new things and sometimes recipes we choose won't be our cup of tea and tonight wasn't my night for some herbal drink. I wasn't feeling it. I'm not a big fan of sausage of any kind. Even in a turkey suit. Also, my part of the crust was a bit on the overly cooked side. It wasn't my type of pizza. BUT...as always we encourage you guys to try it out. Everyone else really liked it.


Tid Bits:

*Pork sausage not your fave thing to eat? Try some turkey Italian sausage.

*Take your pizza dough out 20 minutes before you plan on rolling it out and using it.

*We used frozen chopped onions (crying in your pizza is um, not tasty) and minced garlic and it turned out good. So if that's what you have in your kitchen give it a whirl.

*Salads are always nice with something like this too.

*Try out your favorite veggies and pizza toppings with this dish. Load it up and make it your own.


Ma's Spot:
I liked this pizza a lot but there are some definite changes I would make. I wouldn't do the whole patty. My way would be to crumble it up and put it into the pizza rather than Frisbee style. I really like the idea of using the corn meal it made the crust crispy. I normally don't like deep dish but I enjoy this one. The only draw back was getting the pizza dough's sides up the pan easily. They wouldn't work with me since I didn't let the dough sit at room temperature long enough. I urge you to take the time to let it sit out. Like I always tell my daughter the first time you do a recipe follow it to the letter then you tweak it to the way you and your family like things. I enjoyed the sauce as well. I will take it from this recipe and use it for other recipes in the future.


Another Tuesday over but as always we'll be back in a week to fill your tummy's and recipe boxes. What's on the menu for next week? It's Ma's pick and we're going sweet & sour. What does that mean? Come back and we'll chat! Have a great week guys :D.


Spoons & Spatula's
~Dinah & Ma

Tuesday, March 29, 2011

Mexican Meatloaf with Spanish Rice

DUN...DUN...DUN.

Yep faithful readers I wrote that dreaded word. MEATLOAF. Now would be the time I could see everyone running for their lives from the food that may or may have not scarred you in your tiny tot years BUT come back! I swear, you'll love this. I'm one of you, I swear. Once upon a time I was a chick who turn her nose up at the slightest thought of meatloaf. I was le'meatloaf snob but then courtesy of an ex-family friend this recipe came in and saved the scary meatloaf years. Kinda like Batman killing off that pesky penguin.

So what exactly goes into this genius food labeled Mexican meatloaf? Follow me!

Mexican Meatloaf
Serves 4 to 6

1 burrito seasoning
1 10 ounce tortilla chips
1 26 ounce salsa
8 ounces shredded Mexican cheese
2 lbs ground round
1 lb ground turkey


Spanish Rice

1 14.6 ounces diced no salt added tomato's
Half can of water (use the can from your tomato's)
1 cup of chopped green pepper/onion mix
2 bags of boil in a bag rice
3 tablespoons of margarine
1/2 packet of burrito seasoning (not to be confused. In all you should buy 2 packages of burrito seasoning)


How to make Mexican meatloaf:

*Place your thawed turkey and hamburger in a bowl. Add half the jar of your salsa, one cup of cheese, and the bag of chips (crush them finely). Mix well then place mixture into a one or two quart (whatever works for you) casserole dish. Shape mixture into meatloaf shape and bake at 425 degrees for 40 to 45 minutes. Whenever the middle is done. Every oven is different. Once done add the remainder of your cheese and salsa to top off the meatloaf. Place back in oven until cheese is melted. Take out and let cool for 5 minutes. Cut and serve!


How to make Spanish rice:

*Place your skillet on medium heat. Add your butter and once melted add your rice. Stir and cook rice until lightly toasted. Once toasted add your 1/2 package of burrito seasoning. Stir and let it cook for 2 to 3 minutes. Add your pepper mix, your can of tomato's (with juice), and a half can of water. Cover and let it cook on medium heat until your rice is tender. Stiring every so often.


So how did this one do? Quite well if you ask us! For many years this has been one great recipe for the whole family to enjoy. We encourage you to make this. It's something quite tasty!


Tid Bits:

*Use your choice of meat. Whatever you prefer. It'll all taste yummy!

*Looking for a spicy kick? Jazz it up with some hot salsa.

*Add sour cream to meatloaf and rice. It's delish!

That's it...I know. It's a first for us. See? I told you this is awesome. It's so good there aren't a lot of tid bits, haha.


Ma's spot:
This meatloaf was always a big hit with my family. It's the only way I could get my daughter to eat meatloaf. The recipe came to us from my dear friend Todd's ex-wife Michelle. For those of you who are looking to have this dish on the lighter side you can use fat free sour cream, all turkey, organic tomato's, etc... to lighten it up. The Spanish rice I made up myself because the box Spanish rice is loaded with sodium. Anyone who is watching their blood pressure (like myself) this is a good choice. After you slice the meatloaf and plate it try some sour cream and salsa on top. Gives it something extra.


Alrighty peeps, that's it for this Tuesday. Aw, cheer up meatloaf cheerleaders (at least I hope so after you try this, haha) we'll be back here next Tuesday with my pick. What's on the menu? We're going to Chicago baby! Well...only in our kitchens but I promise it is not one to be missed! Have a lovely week guys!


Spoons & Spatula's
~Dinah & Ma

Tuesday, March 22, 2011

Quick Chicken Parmesan

*sings*
"Like the fella once said,
Ain't that a kick in the head?"

Ah, Dean...gotta love a good Dean song. OH! Hiya ladies and gents. Damn Tuesday comes back around so quickly but we like it that way eh?
So as you may have read in the beginning of this entry we're getting in touch with our inner Bellas Italian heritage this week courtesy of yours truly. So while researching (yep, we do end up doing some research. You can think of us as blog chick smarties haha) for this week's recipe I came across this in my bookmarked tab for recipes and I actually completely forgot about this recipe. Like it was a D-list celebrity and I'm not talking Charlie Sheen status cause let's be real he is pretty epic these days. So I decided why not? Everyone loves some chicken and who doesn't love some pasta? Yeah, thought so. :]. It comes from the Campbell's website (Quick Chicken Parmesan) and it's really simple. Like getting out your favorite coloring book and crayons and coloring kind of simple....what you don't color?...*crickets* Um, am I alone here?...okie well...OH ANYWHO! lol

So how goes this recipe? Follow me dolls:


Quick Chicken Parmesan

Source: Campbell's Kitchen
Prep: 5 minutes
Bake: 25 minutes
Makes: 4 servings

4 skinless, boneless chicken breast halves (about 1 pound)
2 cups Prego® Traditional Italian Sauce or Fresh Mushroom Italian Sauce
2 ounces shredded mozzarella cheese
2 tablespoons grated Parmesan cheese
1/2 package (8 ounces) spaghetti, cooked and drained (about 4 cups)

* Place the chicken in a 2-quart shallow baking dish. Top the chicken with the sauce. Sprinkle with the mozzarella cheese and Parmesan cheese.
* Bake at 400°F. for 25 minutes or until the chicken is cooked through. Serve the chicken and sauce with the spaghetti.


Okie before I go on I have to tell you all that no matter what that recipe says PLEASE PLEASE cook that clucking piece of tastiness until it is fully cooked. Don't take that 25 minutes in stone. Every oven varies and we had ours in for almost an hour.

Phew! I feel better, now onto the food. We loved it! Very classic and filling. Everyone liked it around here as well. So I'd score that one as a hit. Wouldn't you??


Tid Bits:

*As always garlic bread is a nice companion for this dish as well as a nice small side salad. Whatever floats your Italian gondola.

*Have GERD? We do, yep both Ma and I have it. We suggest slow cooking the tomato sauce for a few hours and jazz it up! Cut up some peppers or add some Italian seasoning. We say whatever makes your spaghetti sauce sassy then throw it into this recipe.

*Oh and to give it extra creamy pep? Try stirring in some ricotta cheese.


Ma's Spot: Really really liked this one. It's a lot easier than having to bread your chicken and cook it up. Place the chicken in the sauce and let it cook. Please always remember to add things to jazz up your jar of sauce. You don't always have to do homemade sauce because your jar sauce is the basis of homemade sauce anyways. What you do with it is what makes the difference. So to add creams, wine, veggies, etc.. you can't go wrong.


That's it peeps! Time to part ways for another week but you know the drill we'll be back next week with another fab dish to make your mouths water. Next week is Ma's pick and it's delish! It's an American classic with a spicy twist? What in the good golly hell could that mean? Meet us here next week to find out. Have a great week guys!


Spoons & Spatula's
~Dinah and Ma

Tuesday, March 15, 2011

Spinach Pie

Tuesday is here and that means another weekly dish from your favorite blog chicks.

Dinah here to bring to you this weeks tasty creation from our kitchen to yours. What's up our sleeves? Let's get tonight's post rolling!
This week's recipe is Ma's pick. It's chocked full of spinach, and absolutely no pouting! Spinach is tasty and it's hella good for you!
So says this: Spinach is a very nutrient-dense food. It’s low in calories yet very high in vitamins, minerals and other phytonutrients. When you consume this healthy food, you don’t need to worry about your weight-loss diet as you take in abundant, good-for-you nutrients.
Ha! See, so get in touch with your inner Popeye.
OH! and it even has a pie base. Now, if you're like me then a pie is usually something you buy from your local grocery store or bakery not anything you pull out a pie pan for. While I am an aspiring baker, pie isn't in my baking resume. Yeah, I get the questionable looks on your faces but no worries I can make some mean cakes, cupcakes, and brownies. Ask around ;].

Anywho this recipe comes from the 365 Easy One Dish Meals cookbook. Which was a cookbook my Auntie Dee had for years and years that Ma wanted but couldn't convince her sister to give to her until she moved a few years back. Good thing cause this is quite a treat. So what goes into it? Follow me!


Spinach Pie
Prep: 15 minutes Cook: 40 to 45 minutes Serves: 6

1 (15 ounce) package all-ready pie crusts*
1 1/2 teaspoons flour
2 (10 ounce) packages frozen chopped spinach, thawed and squeezed dry
1 cup chopped scallions
1 cup ricotta cheese
5 eggs
1/2 cup grated Parmesan cheese
1/2 pound baked ham, chopped
1/4 teaspoon pepper


1. Preheat oven to 425 degrees. Remove 1 pie crust from package and let stand at room temperature for 15 to 20 minutes. Unfold crust and peel off top plastic sheet. Press out fold lines and repair any cracks by pushing dough together. Place crust, floured side down, in a deep 9-inch glass pie dish. Peel off plastic sheet, easing crust into dish. Then press dough firmly against bottom and up sides of dish.

2. In a medium bowl, combine spinach, scallions, ricotta cheese, 4 eggs, and Parmesan cheese. Beat together to blend well. Stir in ham and pepper. Turn filling into pastry-lined dish.


3. Top with remaining crust. Cut top crust even with edge of pie dish. Reverse dough scraps. Fold edge of bottom crust over top crust, forming a rolled edge around dish. Flute edges of dough decoratively with fingers or fork tines. Cut a 1-inch hole in center of pie crust. Beat remaining egg and brush over top of pie.


4. Bake in center of oven for 20 minutes. Meanwhile, roll out reserved dough scraps and cut out flowers and leaves. After 20 minutes, remove pie from oven and arrange flowers and leaves over top (do not cover vent hole) of pie using beaten egg to attach them. Brush tops of flowers and leaves with egg. Cover edges of pie with foil strips to prevent overbrowning.


5. Return pie to oven and continue baking 20 to 25 minutes, or until set. Let stand at least 15 minutes before serving.


I really liked this dish a lot. My only turn off was the turkey ham. I'm not a fan of any kind of ham period. Not even if it's dressed in a turkey suit. Sorry piggy lovers. I liked the crispy and flaky pie crust with the spinach it made a nice balance.


Tid Bits:

*As mentioned above if turkey ham or ham isn't your thing try some chicken or turkey goodness.

*We used egg beaters and you can too! Besides eggs really suck in the cholestrol department so why not cut out the future damage and use a better alternative? As the package says 1/3 cup for every whole egg.

*If you don't have green onions, we suggest using regular onions.

*Make sure to squeeze all the liquid from the spinach in a kitchen towel. As I've mentioned before not doing so will result in a mega soupy spinach pie. *shakes head no* not good guys. Not good.

*Need something to accompany the main star? We made a nice chef salad to go with it so give it a whirl!


Ma's Spot:
I really enjoyed this dinner. I think it's a perfect light summer dinner. You can make & cook the pie ahead of time and freeze it in a freezer bag, pull it out, place in microwave till warm, and with a nice side salad you have a nice summer dinner. I like it cause it's so versatile, you can use whatever you fancy. Turkey, chicken, turkey ham whatever you like. You can turn this recipe into a healthy meal.


And that's it! I know I know, I get sad too. No worries, we'll be here again in 7 days to share our recipes. What's in store for next week? It's my pick and we're going a little Italian. So bring your wine and best Dean Martin music and we'll bring the food! Have a great week guys!


Spoons & Spatula's
~Dinah & Ma